Custom wf-directives
Intro
Note: Since XalokNext uses a Vue app, Vue custom directives can also be defined and used inside the editor. While the syntax of wf-directives has been inspired by the Vue flavor, they are two completely different things: wf-directives run at compilation phase, transforming the wf-html into something that Vue can work with, while the Vue directives are being ran at runtime - either when editing the contents in the browser, or as part of rendering contents in the SSR. For this, an effort has been made to call them wf-directives instead of simply directives throughout this documentation.
Flow
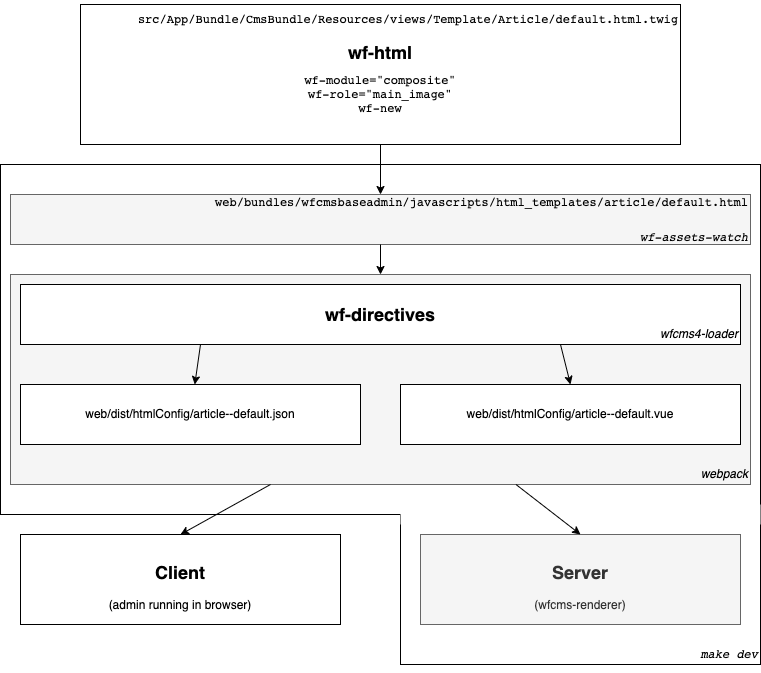
The wf-html written in the twig files residing in the App/Bundle/CmsBundle/Resources/views/Template directory are being used when compiling the assets, either through make dev in the development environment, or through make wf-assets in the CI environment). Either of these tasks render the twig files and save the resulting HTML to the HDD. From there, webpack picks them up, passes them through the wfcms4-loader webpack loader and bundles them together with the rest of the JS code that is used to controls the editors. The role of the wfcms4-loader webpack loader is to apply wf-directives. In turn, these wf-directives extract the configuration of the modules into a JSON file (also bundled together with the rest of the JS code) and transform the HTML to make it suitable for using as a Vue template.
The resulting .json files are saved to the web/dist/htmlConfig directory.
Debugging vue files
Optionally, by setting the WFLOADER_EMIT_VUE environment variable, the loader emits a '.vue' file that contains the transformed HTML. e.g.: WFLOADER_EMIT_VUE=1 make wf-assets, or WFLOADER_EMIT_VUE=1 make dev.
The .json files are being used by the PHP application (for example, in the case of wf-serializable wf-directive, to know what properties should be serialized). The .vue files are being saved to HDD only for debugging purposes. Inside webpack, they are passed to the vue-loader that turns them into pure JS code.
Sample .vue file
Modules/Intro section shows an example of a JSON configuration extracted by the wfcms4-loader. Here's an example of a resulting .vue file:
// wf-html
<div class="menu">
    <a wf-role="link">Insert link</a>
</div>

// is turned into this .vue file
<template>
  <wf-root v-slot="{ module, settings, wfRolePath, moduleConfig, currentPage, filters, config, platform, store, IS_SERVER, IS_CLIENT, }">
    <div class="menu">
        <wf-container>
          <template v-slot:menu-item="{ role }">
            <wf-module :role="link">
              <template v-slot="{ module, settings, cm: { category, tag, page }, wfRolePath, moduleConfig, currentPage, filters, config, platform, store, IS_SERVER, IS_CLIENT, }">
                <a v-wf-sort-state="store.state.moduleSort[wfRolePath.join('/')]"
                   :ref="`moduleRef--${role}`"
                ></a>
                <template v-slot:toolbar="{ moduleLayout, moduleHovered, moduleRef }" >
                  <wf-module-toolbar position="top"
                    :module-layout="moduleLayout"
                    :module-hovered="moduleHovered"
                    :module-ref="moduleRef"
                  >
                    <template v-slot:end-before-buttons="{ wfRolePath, store }">
                      <button class="btn btn-small btn-toolbar"
                              data-wf-label="Debug module data"
                              v-on:click="() => { $window.wfDebugModuleData(store, wfRolePath); }" >
                          <i class="fa fa-bug"></i>
                      </button>
                    </template>
                </wf-module-toolbar>
              </template>
            </wf-module>
          </template>
        </wf-container>
    </div>
  </wf-root>
</template>
(Yeap! All that code is needed to run the Vue app! 😃 )
A short breakdown of what happens in the process:
- wfcms4-loader wraps the entire HTML in a
<wf-root>element which, in turn, is wrapped inside a<template>element - wf-module wf-directive wraps the HTML of its element in:
- a
<wf-container>element that handles the logic of repeating the module as many times as the data has (the editor added 3 paragraphs - wf-container duplicates theparagraphslot 3 times, passing to each of them the data corresponding to each paragraph). - a
<template>element for thelinkslot of the<wf-container> - a
<wf-module>component that handles the logic of rendering the toolbar and the HTML of the module - a
<template>element that receives the module's data and other properties so it can use them while rendering the HTML - this iswf-module's default slot
- a
- wf-toolbar-position wf-directive adds the
toolbarslot for the<wf-module>component.
Registering a custom wf-directive
Unlike most other JS code used throughout the admin, that is being used inside the browser, the wf-directives code is being used in the same process where webpack runs - that is, in a NodeJS environment. To make this distinction clear, the recommended location for wf-directives is the src/App/Bundle/CmsBundle/Resources/wf-directives directory.
Note: this is in the CmsBundle, not CmsAdminBundle, and it's a direct subdirectory of Resources, not inside the Resources/public directory.
To add a custom wf-directive, open src/App/Bundle/CmsBundle/Resources/wf-directives/index.js and add an entry there:
// src/App/Bundle/CmsBundle/Resources/wf-directives/index.js

module.exports = {
    wfSample: require('./wf-sample')
}
The key (wfSample) is the camelCased name of the wf-directive. To use the wfSample wf-directive, add its kebab-cased name (wf-sample) as an attribute to an element.
Syntax of using wf-directives
The syntax for using wf-directives allows defining some custom parts, best illustrated using an example:
<img wf-filter:image_50_50.absolute.no-alt="currentPage.authors?.[0]?.avatar" />The above example shows:
- the name of the wf-directive:
wf-filter - the argument of the wf-directive:
image_50_50 - some modifiers applied:
absoluteandno-alt - a value:
currentPage.authors?.[0]?.avatar
All of the above are optional, besides the wf-directive's name, of course 😃
Example: Using an expression for the directive value inside wf-components
<img :wf-filter:image_50_50.absolute.no-alt="wfc.filter" />In the example above, the directive function also receives:
- isExpression:
true
The code of the wf-directive
The example shown in the Registering a custom wf-directive section makes reference to the src/App/Bundle/CmsBundle/Resources/wf-directives/wf-sample.js file that'll hold the code of the wf-directive. At the minimum, the code of the wf-directive is a function:
// src/App/Bundle/CmsBundle/Resources/wf-directives/wf-sample.js

module.exports = (el, binding, moduleConfig) => {
  // code of the wf-sample wf-directive goes here
}
This function receives the instance of the DOM element that the wf-directive is bound to (el), the binding object containing value, arg, modifiers and isExpression keys - corresponding to the things highlighted in the Syntax of using wf-directives section and a moduleConfig object, detailed in the Module config section.
For more advanced uses, the code of the wf-directive can be turned into an object, allowing to specify additional details besides the binding function:
module.exports = {
    bind: (el, binding, moduleConfig) => {
        // code of the wf-sample wf-directive goes here
    }
}
Priorities
The code of some wf-directives supposes that other wf-directives has been ran previously to their own. For example: wf-toolbar-position needs to insert the toolbar's slot inside the <wf-module> component that is, in turn, being added by the wf-module wf-directive. So if they were being ran in a random order (the order they appear in the DOM, for example), there would be a chance that wf-toolbar-position runs before wf-module has ran, so it wouldn't have where to add its slot.
For this, wf-directives support priorities. wf-module has the highest priority, as its role is to instantiate the moduleConfig that most other wf-directives need and to wrap everything in the <wf-module> element that some other wf-directives need.
Example:
module.exports = {
  priority: 100,
  bind: (el, binding, moduleConfig) => {}
}
Binding phases
wf-module wf-directive has a double role: first, it needs to wrap the bound element in the tags that the Vue application needs, as mentioned above. It needs to do this step among the first wf-directives, as mentioned in the Priorities section. Then, it needs to extract all the content models (if any) used in the bound element. But for this second stage, it has to "wait" for all other wf-directives to complete. Imagine this case:
<div wf-role="image">
  <img wf-filter="thumbnail_filter" />
</div>
In the first phase where wf-module runs, there's no image content model bound to this element - wf-filter comes later and applies :src="...image..." to the <img> element.
For this, the wf-directives are applied in two phases, a bind phase (the default phase, when the wf-directive is implemented as a function) and a finish phase.
Example: Sample wf-directive implementing both bind and finish phases:
module.exports = {
  bind: (el, binding, moduleConfig) => {
    // binding code here
  },
  finish: (el, binding, moduleConfig) => {
    // finish code here
  }
}
Virtual wf-directives
wf-toolbar-position must be bound to all wf-modules - by default they all show a toolbar at their top. Thus, the code of the wf-toolbar-position wf-directive must run for every module that has the wf-module attribute, even if the wf-toolbar-position attribute is not added specifically by the developer. For this, a wf-directive can extend another wf-directive.
Example: A wf-directive extending a different one:
module.exports = {
    extends: "wfModule"
}
The same mechanism is being used to register wf-app-module wf-directive that extends the base's wf-module wf-directive, so that one doesn't have to worry about manually invoking (or copy->paste 😄) the base's wf-module code when working with custom modules in the project.
Element properties
The first argument passed to the wf-directives' binding function is el, the DOM element where the wf-directive's attribute was added. Aside the usual DOM element properties, if this element is the same element where wf-module/wf-role has been applied, XalokNext registers some properties that can come in handy:
wfRole: the role of the modulewfContainer: every<wf-module>component is being wrapped in a<wf-container>element that handles displaying multiple instances of the module. Siblingwf-modules are being wrapped in the same container, as they can sorted and mixed together.wfContaineris a unique (within the template) ID identifying the container of the givenwf-module.wfModuleSlot: a reference to the<template :role="role_of_module">slot elementwfModule: a reference to the<wf-module>element wrapping the modulewfModuleTemplate: the default slot of the modulewfModuleToolbar: a reference to the<wf-toolbar>element corresponding to the bound modulewfModuleToolbarTemplate: a reference to the default slot (<template>element) of the module's toolbar- toolbar buttons element slots:
wfToolbarStartBeforeButtons,wfToolbarStartAfterButtons,wfToolbarEndBeforeButtons,wfToolbarEndAfterButtons. There are two sections in the toolbar: the start section - where XalokNext displays the buttons for switching to a different module and the end section, the section at the end of the toolbar, where the settings and edit icons are displayed. For both sections, there is a before and an after slot that you can use to add custom buttons. wfModuleSettings: a reference to the<wf-settings>component for the given module - useel.wfModuleSettings.appendChild(customSettingElement)to add custom settings to the settings form of the module.
If the wf-directive is applied to an element inside the module and you want to access the properties above, you can use moduleConfig.moduleEl to get a reference to the nearest module element.
Module config
The third argument passed to the wf-directives' binding functions is moduleConfig, an object holding the configuration of the closest wf-module to the bound element. Aside holding the JSON configuration that will later be dumped to the HDD and bundled with the JS code, it has some useful properties/methods:
rolethe role of the module to which thismoduleConfigbelongsrolePaththe rolePath (array of roles up to this module) of the module to which thismoduleConfigbelongsmoduleElholds a reference to the nearest module element - if this element must be addressed from a directive that is applied to an inner element.parentConfigproperty holds themoduleConfigfor the parent moduleaddContentModel(contentType)registers a content model type for the given element