Images
Twig functions
wf_page_image(Page $page, $filter = '', $platform = null):
Returns the formatted URL of the image. If the platform parameter is present get the URL for the page's main image from that platform's modules, otherwise get it from the default modules.
Note: It's IMPORTANT to use this function instead of obtaining it by using page.mainImage|apply_filter('og_thumbnail') directly because this function also takes into account the focal point coordinates, if the editor changed them.
Example: get the URL for the page's main image
wf_page_image(page, 'og_thumbnail')Example: get the URL for the page's main image from the facebook platform modules e.g.: %cms_main_images_domain%/files/og_thumbnail/uploads/2024/07/16/669614fae4c05.jpeg
wf_page_image(page, 'og_thumbnail', 'facebook')wf_image_mimetype(Image $image):
Returns the MIME type of an image based on its file extension: e.g. image/jpeg.
Example:
wf_image_mimetype(page.mainImage)wf_image_size_attributes($filter):
Generates the HTML width and height attributes based on the filter's size configuration:
Example: for filter defined in imagine.yml:
    og_thumbnail:
        quality: 75
        filters: { wf_thumbnail: { size: [1200, 675], mode: outbound, alignment: top } }
return: width="1200" height="675"
wf_image_size_attributes('og_thumbnail')Image output formats
Filters by output format
For each filter defined in imagine.yml, we can indicate the output format. For example, given the filter:
image_1080_996:
  quality: 90
  filters: { wf_thumbnail: { size: [1080, 996], mode: outbound } }
we can define a similar filter for another format:
webp_1080_996:
  quality: 90
  filters: { wf_thumbnail: { size: [1080, 996], mode: outbound } }
  format: webp
(specific formats may require specific libraries or dependencies, for current deployments in 2024 v7.2 the required ones for webp seem to be available)
Using different filters according to media queries
Typically, the markup to establish an image based on media queries is something like:
    <picture class="c-detail__photo__thumb">

        <source wf-filter="wfc.filterSource" media="(min-width: 768px)"/>
        ...

        <img :loading="wfc.role === 'main_image' ? 'eager' : 'lazy'" wf-filter="wfc.filterImg" :layout="wfc.layout"/>
    </picture>
To suggest the browser use webp in preference to another format, the filter can be replaced by prefixing it, for example:
    <picture class="c-detail__photo__thumb">

        <source wf-filter="wfc.filterSource.replace(/^image_/, 'webp_')" type="image/webp" media="(min-width: 768px)"/>
        <source wf-filter="wfc.filterSource" media="(min-width: 768px)"/>
        ...

        <source wf-filter="wfc.filterImg.replace(/^image_/, 'webp_')" type="image/webp" />
        <img :loading="wfc.role === 'main_image' ? 'eager' : 'lazy'" wf-filter="wfc.filterImg" :layout="wfc.layout"/>
    </picture>
Thumbnail mode
outbound vs inset
Check the difference between outbound and inset modes in the image below:
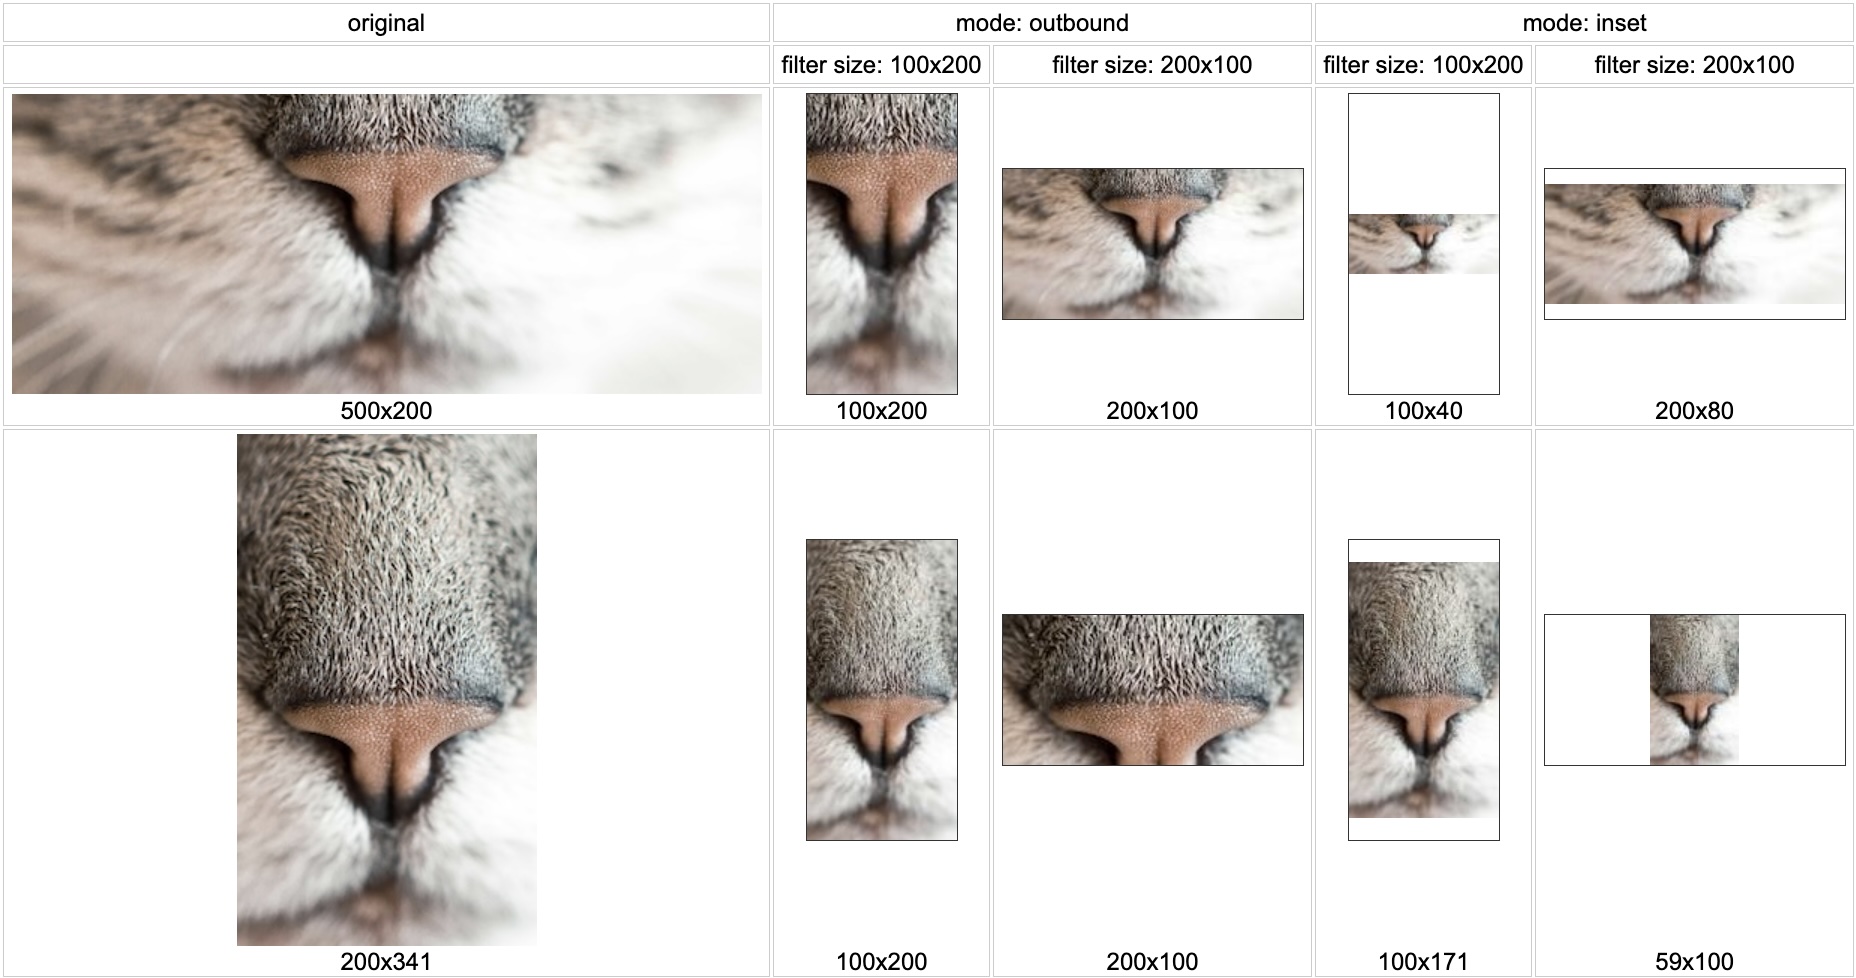
Note how mode: outbound always crops the image to the specified filter size.
mode: inset doesn't crop the image, it just resizes it to fit the specified size. The resulting images match only either the width or the height, but not both.
Mode vs Focal Point
In the editor of Xalok we have the option to put a zoom at the images. You may see focal point editor.
This info only applies to images that have a focal point (zoom).
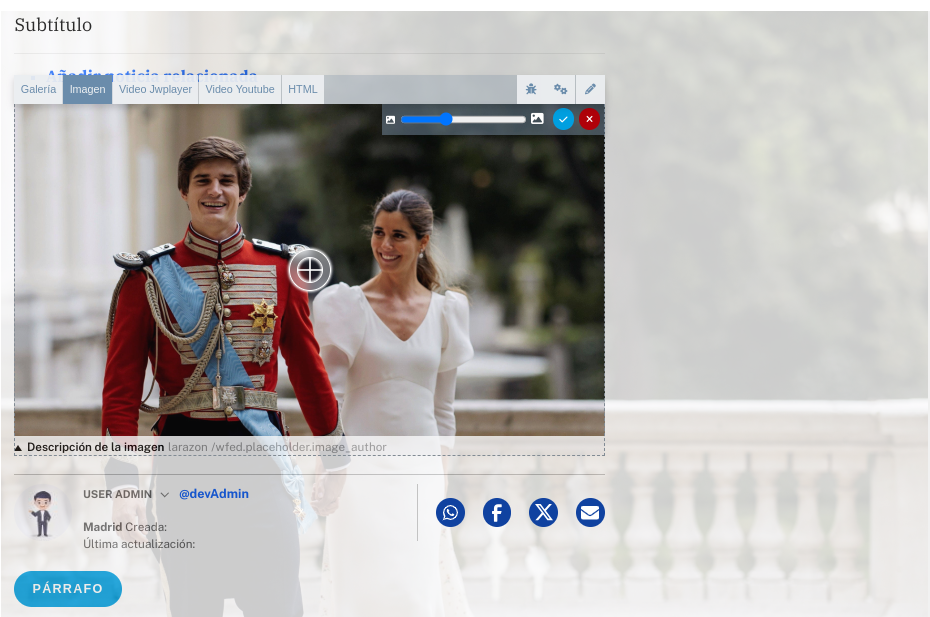
As you can see, the image overflows the module, but it's behaviour changes with the mode selected:
inset: the image will always be rendered full inside the space of HTML reserved to it. That means NO zoom will be applied.outbound: it permits the image to overflow the space reserved to it. So the zoom will be applied.
This is the reason why if a module uses an inset filter, the edit button for the focal point won't be shown.
Image Metadata Cache
The system implements a Redis-based caching mechanism for image metadata to improve performance when working with image transformations and filters.
Configuration
There is a setting called image-metadata-cache that contains a JSON configuration:
{
    "internalSizes": true|false,
    "pregenerated": {
        "filter-list": {
          "article.publish": [
            "filter1",
            "filter2",
            ...
          ]
        }
    }
}
Where:
internalSizes: When set to true, filter dimensions are automatically cached in Redis whenever a filter is generated (if not already cached).pregenerated: Configuration for pre-generating image crops.filter-list: Different lists of filters to generate based on a name.article.publish: List of filters that will be automatically generated when content is published.
Use Cases
The image metadata caching service currently serves two primary purposes:
- Caching filter dimensions: When a filter is applied to an image, its dimensions are cached in Redis. This eliminates the need to recalculate these dimensions each time they're needed.
- Pre-generating filters: When content is published, filters defined in the
article.publishlist are automatically generated. This eliminates the wait time for filter generation when content is accessed for the first time.
Future Applications
This caching system also opens the door to restricting filter generation to internal services and editorial workflows, ensuring that the public-facing part of the site never needs to generate filters on-demand. This would require orchestrating the generation of all necessary filter types during the publishing process, similar to what is currently done.
Watermark
We can add the watermark to a specific filter using a filters_set:
        filter_rss:
            filters:
                wf_thumbnail:
                    size: [ 1920, 1080 ]
                    mode: outbound
                    quality: 75
                    alignment: 'top'
                watermark_image:
                  image: 'web/images/logo.png'
                  position: bottom
But if what we want is to apply a filter to all the clippings of an image, one should add a waterMark column to the Image entity and set the wf_cms.watermark.enabled parameter to true in their project.yml.
The accepted values for the waterMark column are:
- top_left
- top_right
- bottom_left
- bottom_right
- center
- mosaic (fill the image with small watermark images)
- no_watermark (to disable)
IMPORTANT: Until v7.X of Xalok this code was commented on ImagineController. Only one project used it and now is upgrading to v.7.